Using Moesif, AWS, and Stripe to Monetize Your AI APIs Part-3: Managing Customer Credit

This is the third part of a four-part series about AI API monetization. We recommend you go through the first and second part of the series before proceeding with this article.
In the previous two articles, we completed the following steps in our AI API monetization journey with Moesif, AWS, and Stripe:
- Set up the AI API with AWS Lambda and Gateway.
- Integrated the AI API with Moesif.
- Connected Stripe with Moesif. We now have the infrastructure to begin billing for API usage.
- Set up the pricing for the APIs.
- Set up API usage metering with Moesif Billing Meter.
- Set up API Access rules using Moesif Governance Rules.
In this article, we set up a pre-paid credit management for customers in Moesif and Stripe. Moesif can track and meter customer credits in near real-time. This allows you to fully leverage Moesif for API monetization.

Table of Contents
- Table of Contents
- Background
- Create a Payment in Stripe
- Add a Credit to Moesif
- Optional: Automating Account Top-up In Moesif
- Conclusion
Background
To implement pre-paid or pay-as-you-go type billing for monetized APIs, you need to consider these aspects:
- The ability to add credits to an account.
- The ability to burn down those credits.
- The ability to block users from accessing the API once they run out of credits.
Most billing providers allow you to create payments that you can add to a user’s account as a pre-paid credit. Moesif Billing Meter can burn down those credits as we discussed in the previous post. However, the third aspect of the problem gets increasingly more complex.
Billing Providers usually impose a rate limit for reporting usage. This means that real-time balances become much harder to achieve. Real-time balance tracking requires you to feed the billing provider usage information in real time. The billing provider then burns down the balance according to the usage and must report back to the system that controls API access.
Up until recently, this problem had no solution. Luckily, we at Moesif have created a way to achieve near real-time pre-paid API access using our latest Pre-Paid Credits and Balance features.
This set of features allows Moesif to be the book of record for the user’s balance. This means two things:
- You don’t need any round-trips to the billing provider.
- The rate limits billing providers put on reporting usage no longer matters.
As a result, as Moesif meters the usage, Moesif can burn the user’s credits accordingly to achieve a real-time balance. The governance rule we demonstrated in the second part of this blog series will work in near real-time, blocking users when they run out of credits.
For more information on pre-paid credit features in Moesif, see Moesif’s Credit Tracking and Consumption documentation.
In today’s article, we will examine how to charge for API credits in Stripe and then add those credits to Moesif. Let’s begin by looking at adding a payment to Stripe.
Create a Payment in Stripe
Since we are implementing pre-paid API access, we must first charge the customer for a certain amount of credits. We can do this by manually creating a payment in Stripe. You can also make a top-up mechanism in your code or UI. Everything we do here is also available through the Stripe APIs. For this guide, we focus on manually adding the balance top-up.
We assume you already have a customer in Stripe and Moesif. If you do not, you can revisit this section once a customer is added to both platforms. Adding customers will be covered in the following guide, Part 4.
- Go to your Stripe Dashboard and then to the Customers page.
- Select the customer you want to add the top-up to.
- Select Create Payment. A modal appears.
- Select your currency, enter the amount, and select the payment method.
- Select Create Payment.
Stripe will process the payment and add the amount to the customer’s Stripe account. You can see the entry under Payments on the customer’s profile if the payment has been successfully completed.

Add a Credit to Moesif
After creating the Payment in Stripe, we can create the corresponding entry in the Moesif ledger so that Moesif can control access to the API in real time.
To add the amount to Moesif, you must go to the customer’s Company profile page:
- In Moesif Portal, select Companies in the navigation menu.
- In the Lookup table, identify your company and select its comapny ID.
Now add the credits to the company in Moesif by following these steps:
- In the Profile View screen of the company, select ✐ Edit beside Current Balance.
-
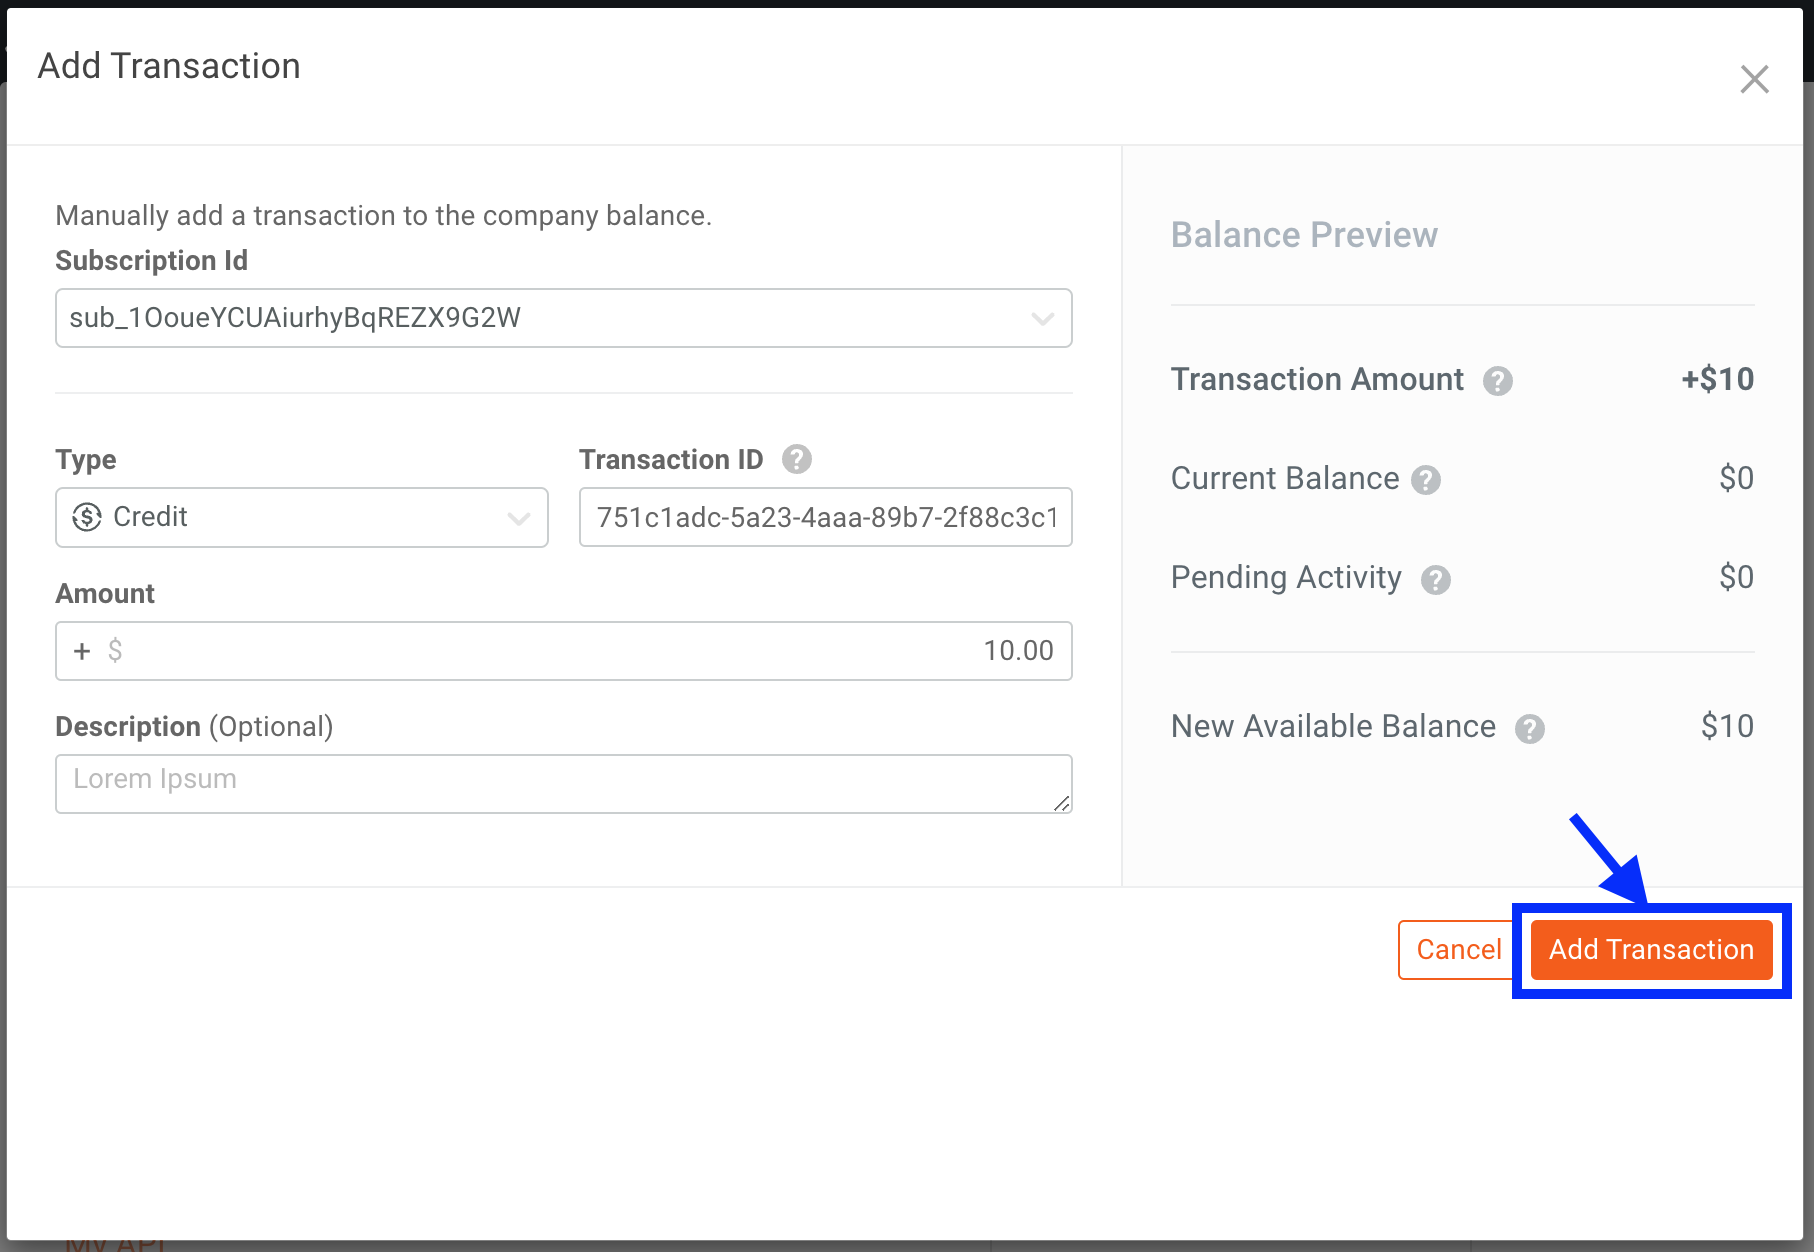
In the Add Transaciton modal that appears, set the Type to Credit and enter
10.00in the Amount field.If you have multiple subscriptions for the customer, ensure that the Subscription Id field value matches the subscription you want to apply the credits to.
- Select Add Transaction.
If you follow these steps, the Add Transaction modal looks like this before finalizing the transaction.

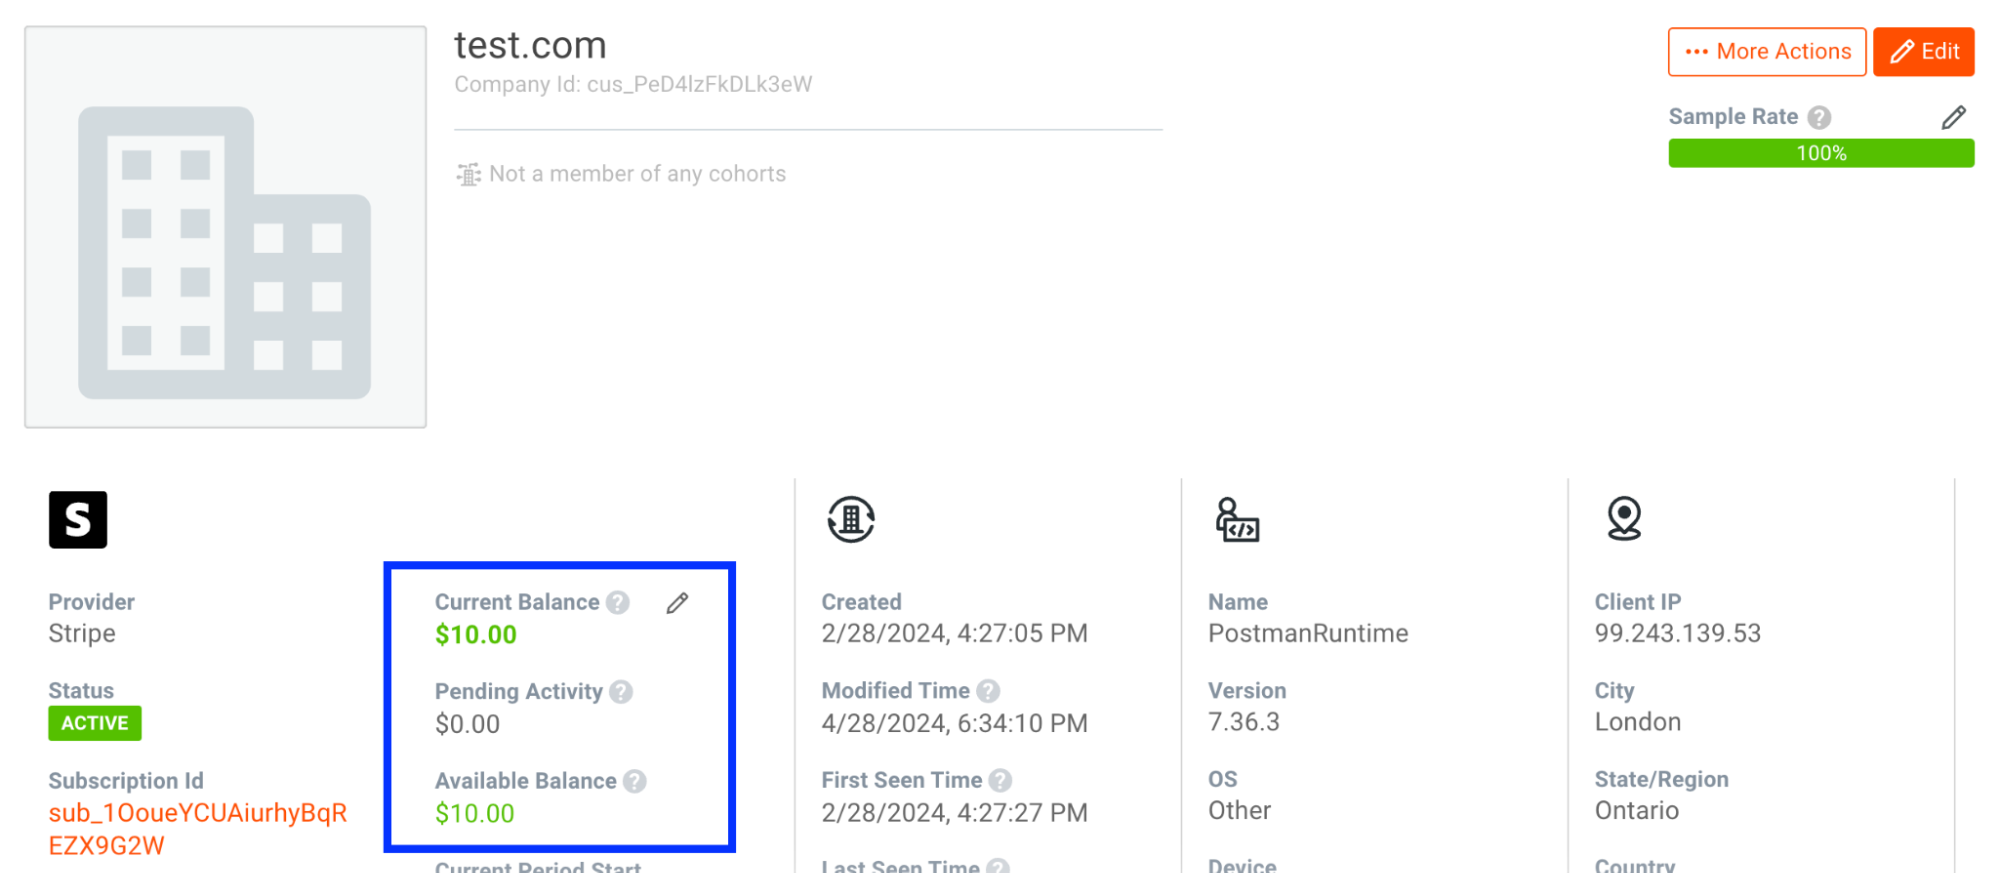
Within a few minutes, the result from this transaction appears in the company’s profile. It shows that the company has $10.00 in its Current and Available Balance.

Each value represents a few aspects of the company or user’s balance:
- Current Balance
- Represents the current balance without factoring in any pending activity or transactions that have not been processed yet.
- Pending Activity
- Represents the activity or transactions (credits or debits) that have not yet been posted. Therefore, this value can change until the transaction completes. Once the transaction completes, Moesif updates the Current Balance and removes the corresponding amount from the Pending Activity value.
For example, if API usage or credits have been added to an account, you can see the corresponding amount here until it has been posted.
- Available Balance
- From a usage perspective, this amount bears the most significance as it dictates what credits a user has left to spend in a pre-paid scenario. This value corresponds to the amount of credits left for the user to consume. This amount equals the formula (Current Balance + Pending Activity).
For example, if your current balance is $1000 and you have a $250 debit transaction pending, your available balance is $750.
So far, we’ve seen how to manually add the balance in Moesif. However, you may also want to have a top-up in Stripe automatically applied to the balance in Moesif.
In the next sections, we discuss how you can automate top-ups using Stripe’s APIs and webhooks.
Optional: Automating Account Top-up In Moesif
Using the Credit Consumption API, you can add pre-paid credits to Moesif. To intercept a payment event in Stripe and apply it to the Moesif balance, you have three options:
- Using webhook
- Using API only
- Using a combined approach that leverages both webhooks and API.
We’ve created some examples that demonstrate how you can implement these options.
Webhook-only App
With this approach, whenever a user’s balance changes in Stripe, a corresponding debit or credit adds to the Moesif balance. Using the Stripe webhook, when a change occurs, the record will be created and sent to Moesif through the Moesif Credit Consumption API.
This approach works well for applications that already have an existing top-up flow and allows for minimal changes. This automated approach enables both balances to stay in sync between the two systems.
For an example, see the sample webhook application webhook-app.js on Github. This application receives a message from Stripe when a user has added funds to their Stripe account. To start this example, clone the Github repo, populate the .env file, and then run the following command:
node webhook-app.js
For this application to work, you must deploy the webhook somewhere. For example, for testing, you can use ngrok or deploy on your existing API infrastructure. Make sure that the webhook is publicly accessible. After deploying the webhook, add the webhook to Stripe with the following steps:
- In Stripe, go to the Developers Dashboard.
- Select the Webhooks and then select + Add endpoints.
- In the next screen, add your webhook endpoint URL in the Endpoint URL field.
- Select + Select events and then select the
payment_intent.succeededevent for the webhook. Optionally, select the events you want to subscribe to without using Payment Intents. - Lastly, select Add endpoint.
You can test your webhook by going through your top-up logic and making sure that the webhook fires and successfully creates the credit or debit entry in Moesif. You can see the debugger output in the console or logs where your webhook is running as well.
API-only App
You may have an existing top-up flow that leverages an API. Therefore, instead of having the webhook execute the logic to do the top-up in Moesif, you can make a direct API call to Moesif’s Credit Consumption endpoint as the payment intent is created.
This example application allows users to call a /top-up endpoint with their Stripe
customer ID and the amount they want to credit to their account. In this approach, the endpoint creates a Stripe PaymentIntent that adds the amount to the user’s Stripe account. At the same time, this endpoint creates a corresponding transaction on the Moesif side, adding the amount to the available balance in Moesif.
You can deploy the endpoint independently or on your existing API infrastructure. However, this endpoint requires users to have a credit card on file and creates a Stripe Payment Intent for the amount they have requested to be charged against that card.
To run the API, clone the Github repo, populate the .env file, and run the following command:
node api-app.js
Combining Webhook and API
This approach offers the best of both solutions. Here’s how this approach works:
- Create an endpoint to initiate the top-up transaction.
- Then use the webhook to apply that credit on the Moesif side once the PaymentIntent has succeeded in Stripe.
The webhook and the API require the same configuration as the initial webhook and API examples we discussed in the preceding sections. In this solution, the /top-up REST API endpoint and the webhook run in the same node project. However, you can separate your concerns as you need for both.
You need to host the node app publicly. To test the functionality in your local environment, clone the Github repo, populate the .env file, and run the following command:
node webhook-api-app.js
Using any of these three approaches, you can automatically apply top-up payments processed through Stripe to the balance in Moesif. This gives you automation and more scalability than manually adding these transactions by hand in Moesif.
Conclusion
In this article, we’ve successfully added a balance to customers in both Stripe and Moesif. This will help to enable pay-as-you-go billing in real time and leverage the infrastructure we created in the second part of this series. If you’ve followed along so far, you now have a complete pre-paid system that allows you to meter usage, burn down credits, and manage API access based on customers having an available balance of credits to use.
In the next and last part of this series, we focus on onboarding customers. We cover how to register customers in Moesif, Stripe, and AWS so that they can use the APIs. At the end us, you’ll have a complete end-to-end API monetization setup to start driving revenue from your AI APIs (or any API, for that matter!). Until next time, stay tuned for the final part of this AI API monetization With AWS, Stripe, and Moesif series!


