Using Moesif, AWS, and Stripe to Monetize Your AI APIs Part-2: Setting up Metering and API Access

This is the second part of a four-part series about AI API monetization. We recommend you go through the first part of the series where we integrate the platforms before proceding with the second part.
In the previous article, we set up the AI API with AWS Lambda and Gateway, integrated it with Moesif, and then connected Stripe with Moesif. We now have the infrastructure to begin billing for API usage.
In this article, we move on to configuring Moesif with the following steps in the API monetization journey:
- Pricing
- Metering
- Access control and governance
First, let’s set the prices we want to charge for API usage in Moesif.

Table of Contents
- Table of Contents
- Create Your API Pricing in Moesif
- Metering API Usage With Moesif
- Enforcing Pre-Paid Access to the API With Moesif Governance Rules
- Blocking API Access For Users With Overdue Invoices
- Conclusion
Create Your API Pricing in Moesif
In Moesif, you can configure the plans and prices for APIs through the Moesif Product Catalog. Product Catalog allows you to configure your plans and prices conveniently in Moesif, and Moesif automatically creates them in Stripe. This enables you to do everything within the Moesif platform instead of bouncing between the two.
For our AI API example, we want to create two distinct prices for our AI API Plan. If you have multiple plans or tiers, you can duplicate what we do here for each plan you want to create. To simplify things, we create a single plan with two prices, one for each token type: input and output.
In this section, we create a Plan for the AI API and then two prices for each token type. A Plan in Moesif translates to Product in Stripe. For more information, see Provider Mapping.
Create the Plan
To create the plan in Moesif, follow these steps:
- Log into Moesif Portal.
- Select Product Catalog in the navigation menu.
- In the Plans screen that appears, select Create New.
-
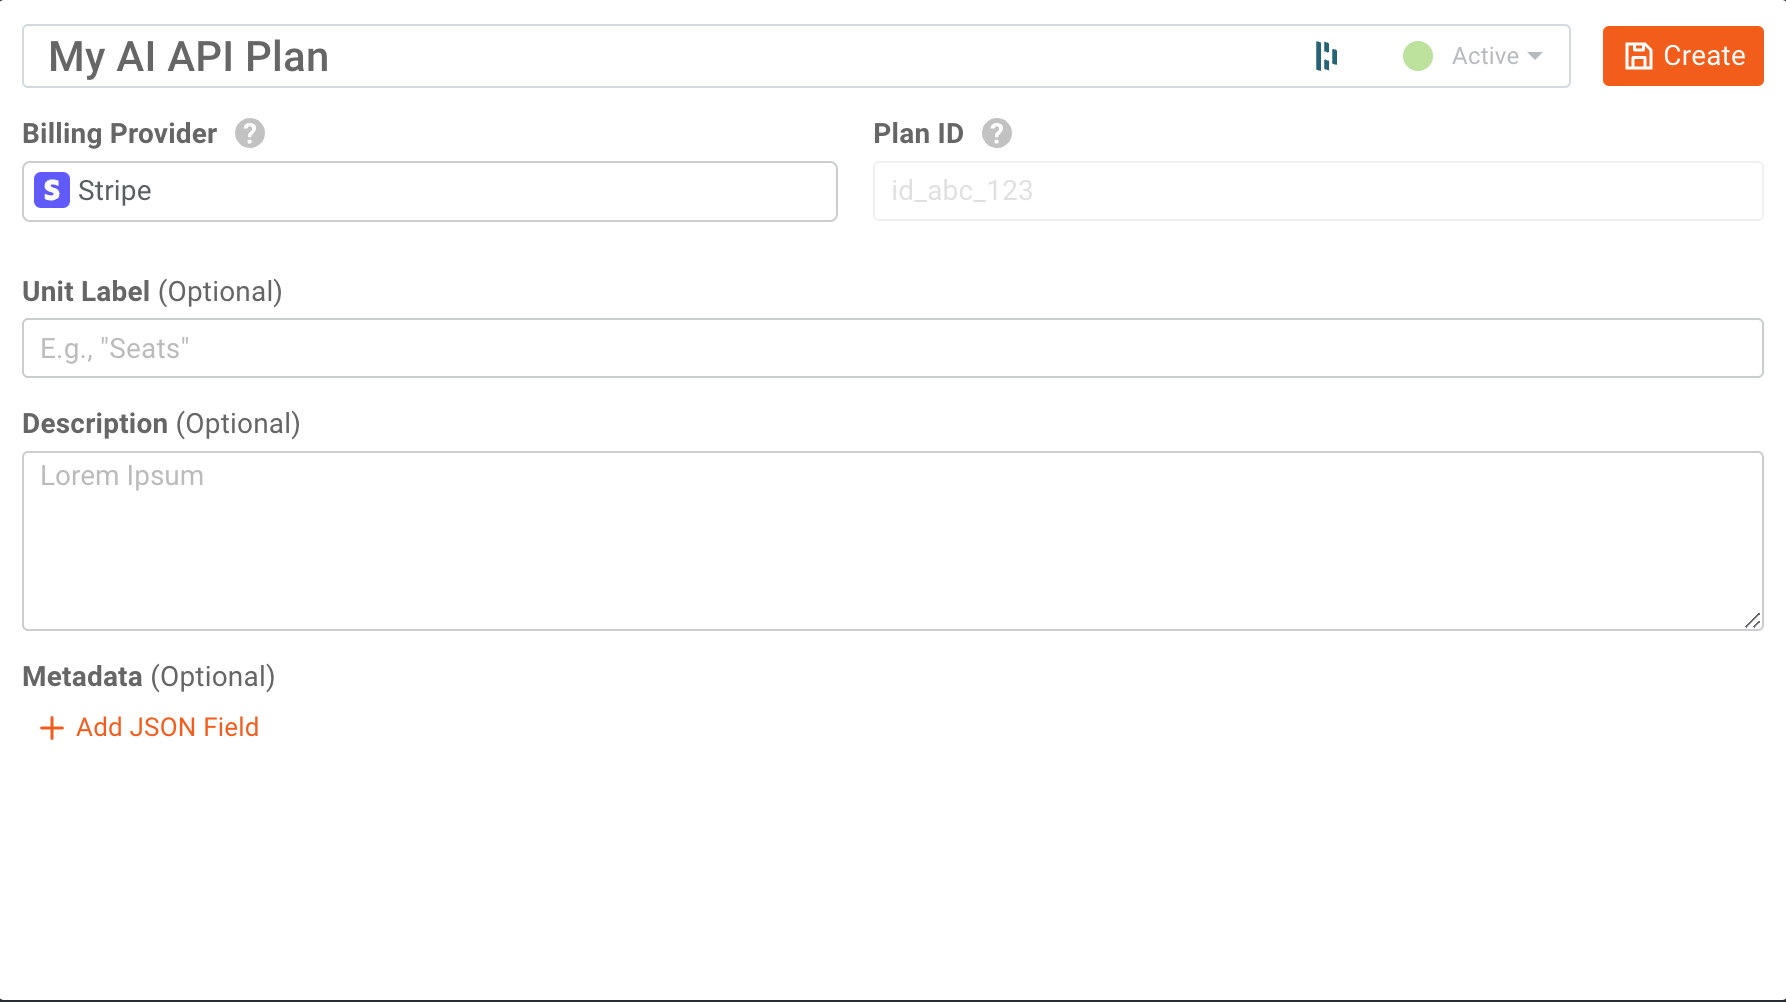
Then add the following details about the new Plan:
a. Enter a name for your Plan.
b. Select Stripe from the Billing Provider dropdown.
- Lastly, select Create.
For example, here we create a plan “My AI API Plan”:
Next, we define the prices for input and output tokens.
Create the Prices
After selecting Create and creating a plan, a dialog appears confirming that you’ve created the Plan successfully. The dialog also prompts you to create a price for the plan by selecting Create Price. Alternatively, you can select Product Catalog and then select Prices in the navigation menu.
Create Prices for Input Tokens
In the Create Price screen, follow these steps:
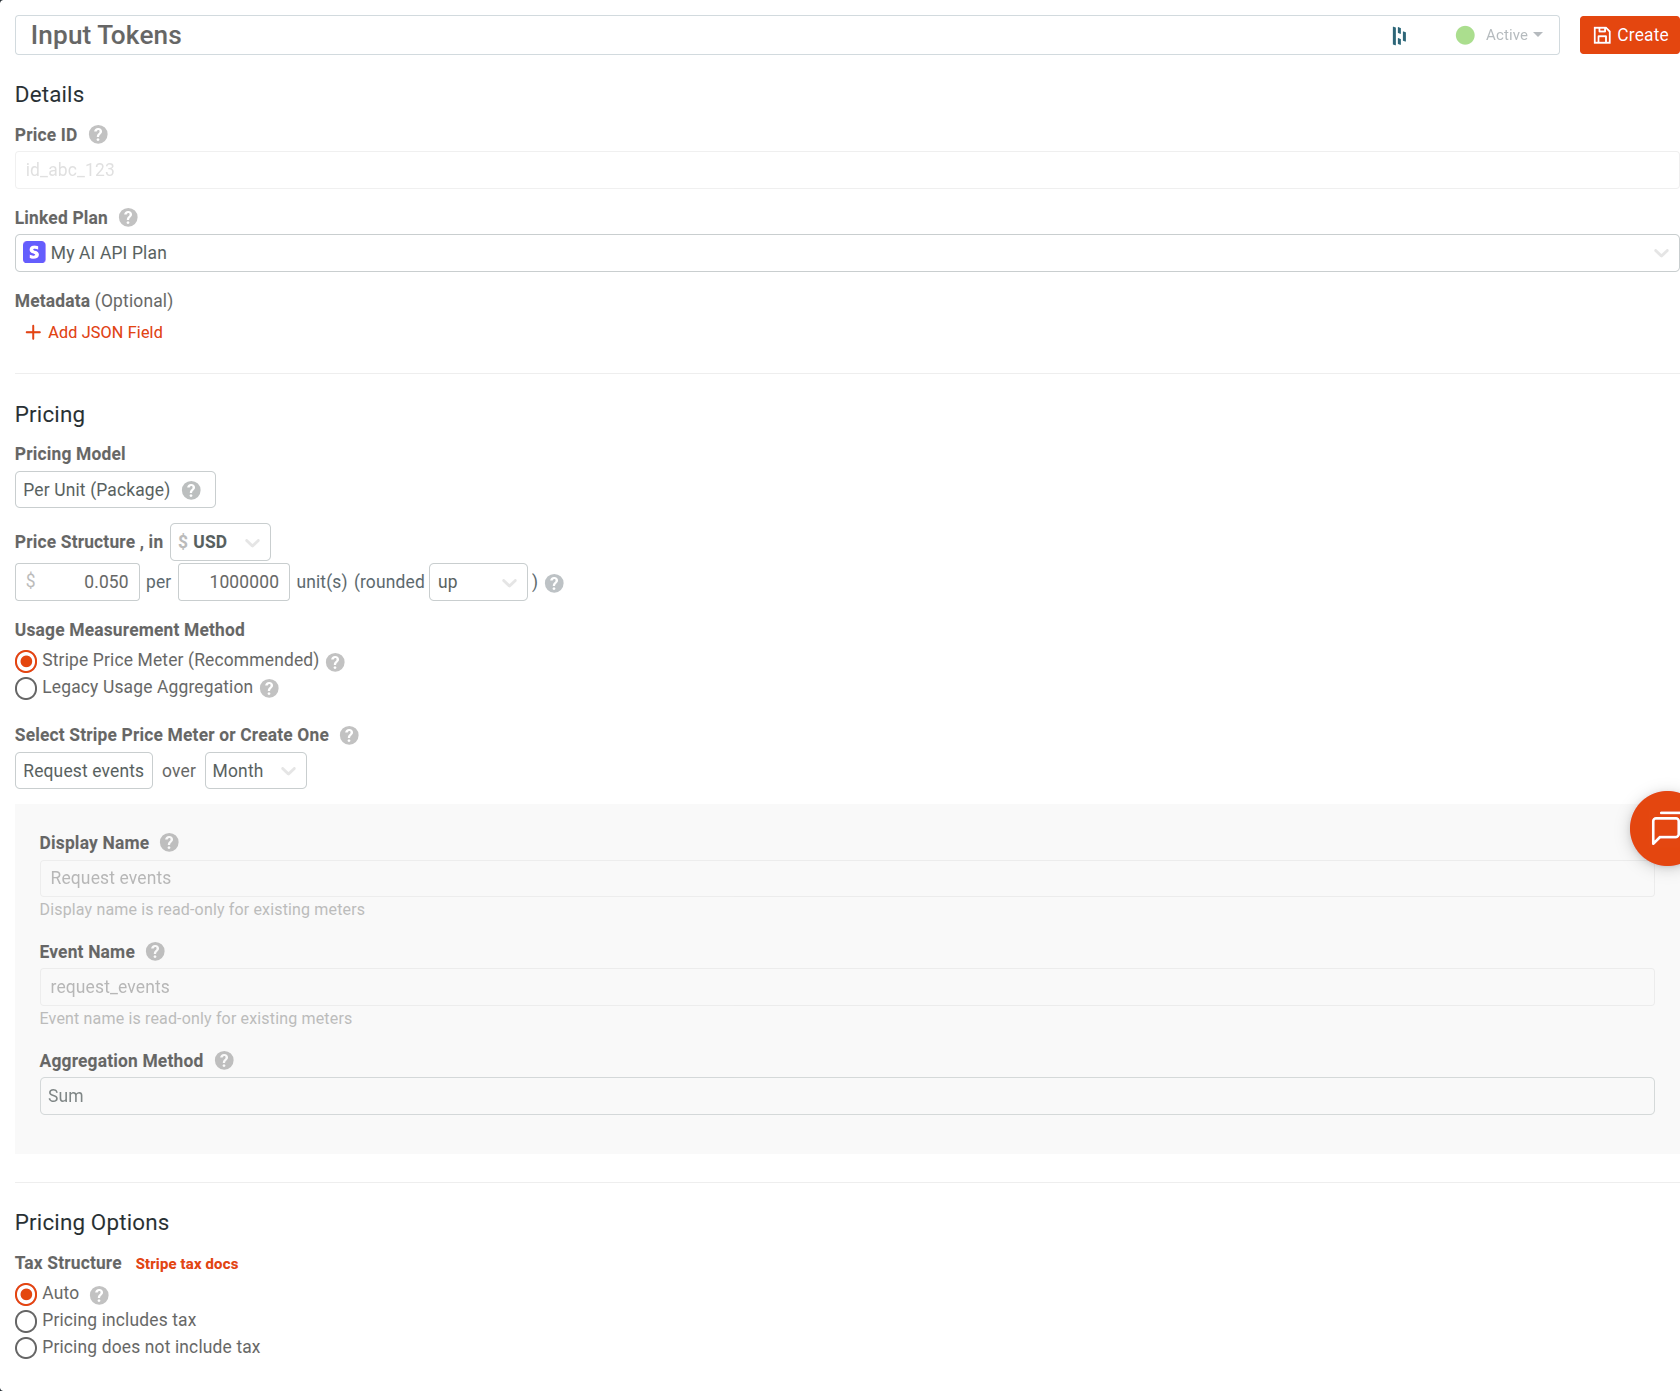
- Enter a price name..
- In Linked Plan, select the plan you created in the preceding section.
- Select Per Unit in Pricing Model. If you have another pricing model you want to use, you can select it from the dropdown menu and configure it for your use case.
- In Usage Measurement Method, select Stripe Price Meter. Then select from an existing Stripe meter or create a new one. Select Month as the period of time for aggregating usage and Sum as the aggregation method.
- In Price Structure, set
$0.50for the unit price,1000000(one million) for the number of units, andupas the rounding direction. - Keep Tax Structure at Auto.
- Select Create.
For example, here we create a price called “Input Tokens”:
Once you save the price, a workflow dialog appears to create a Billing Meter or Governance Rule. Since we create these components later, skip this for now and exit the dialog.
Create Prices for Output Tokens
- Select Product Catalog and then select Prices in the navigation menu.
- Select Create New.
- Enter a price name.
- In Linked Plan, select the plan you created.
- Select Per Unit in Pricing Model. If you have another pricing model you want to use, you can select it from the dropdown menu and configure it for your use case.
- In Usage Measurement Method, select Stripe Price Meter. Then select from an existing Stripe meter or create a new one. Select Month as the period of time for aggregating usage and Sum as the aggregation method.
- In Price Structure, set
$1.50for the unit price,1000000(one million) for the number of units, andupas the rounding direction. - Keep Tax Structure at Auto.
- Select Create.
You now have a plan and two associated prices for input and output tokens. Let’s begin to meter API usage so that Moesif can report usage statistics to Stripe.
Metering API Usage With Moesif
In this section, you’ll learn to use Moesif’s Billing Meter to meter API usage. The Billing Meter will define these requirements for metering usage:
- The plan and price the API usage you want to report to or bill against.
- The traffic you want to meter—for example, URI routes and response status.
- How you want to meter the traffic—for example, per API call and unique user.
Let’s create two billing meters for the two token types.
Create the Billing Meter for Input Tokens
- Select + Create New in the left navigation menu and then select Billing Meter.
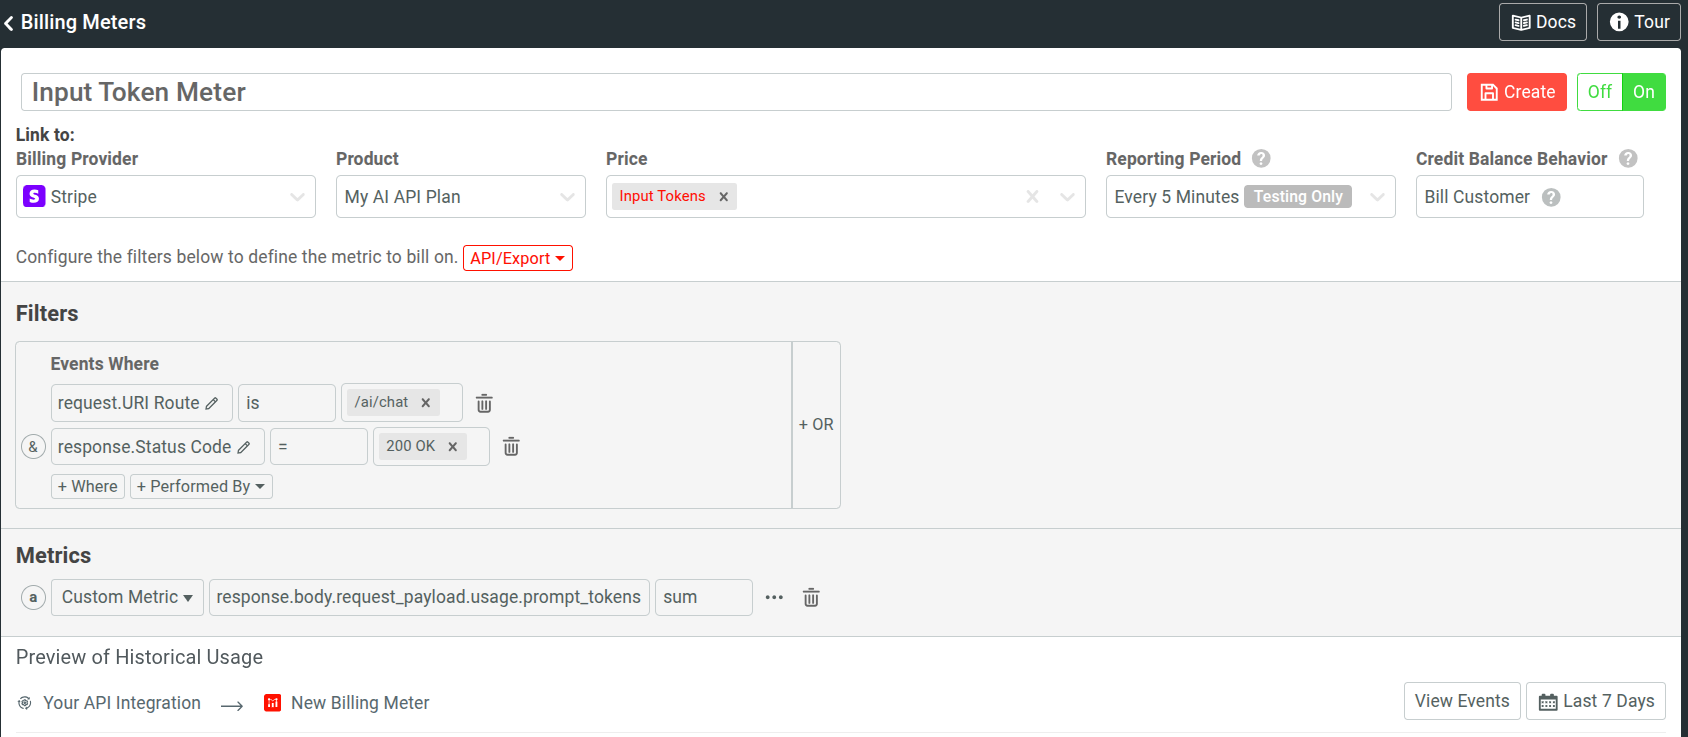
- Enter your meter name.
- Select
Stripefrom the Billing Provider dropdown. - Moesif then automatically shows you the products and prices you have associated with the billing provider. Select the Plan and associated price for input tokens that you created earlier.
- Set the reporting period to
Every 5 minutes. -
In the Filters pane, add the following criteria:
a. Set
Request.URI Routeto/ai-chat.b. Set
Response.Status Codeto200 OK -
In the Metrics pane, select Event Count and then select Select Field… from the dropdown. This lets you define a custom metric field.
a. From the field selector, select
response.body.request_payload.usage.prompt_tokens.b. Set the aggregation function to
sum (Unweighted). - Select Create to create the meter.
- Optionally, you can test the meter by selecting Test Meter afterwards. For more information, see Testing Billing Meters
For example, here we create the meter “Input Token Meter” for input tokens.
Create the Billing Meter for Output Tokens
- Select + Create New in the left navigation menu and then select Billing Meter.
- Enter your meter name.
- Select
Stripefrom the Billing Provider dropdown. - Moesif then automatically shows you the products or plans and prices you have associated with the billing provider. Select the Plan and associated price for output tokens that you created earlier.
- Set the reporting period to
Every 5 minutes. -
In the Filters pane, add the following criteria:
a. Set
Request.URI Routeto/ai-chat.b. Set
Response.Status Codeto200 OK -
In the Metrics pane, select Event Count and then select Select Field… from the dropdown. This lets us define a custom metric field.
a. From the field selector, select
response.body.request_payload.usage.completion_tokens.b. Set the aggregation function to
sum (Unweighted). - Select Create to create the meter.
- Optionally, you can test the meter by selecting Test Meter afterwards. For more information, see Testing Billing Meters.
At this point, the billing meters we have created will meter usage based on the criteria we set for each API call. Then, they sync this usage to Stripe to accurately charge the user.
In the next steps, we put some restriction policies on access. These will allow you to block users from accessing the API when they run out of pre-paid credits, or have an overdue invoice if they are post-paid users.
Enforcing Pre-Paid Access to the API With Moesif Governance Rules
To block API users from accessing the API when they have run out of credits, we use a Moesif Governance Rule. Moesif gives you several templates to create a rule, including one where Moesif blocks the user when their balance reaches zero.
To make this Governance Rule from Moesif Portal, follow these steps:
- Select Quotas & Governance from the navigation menu and then select + Add New. Alternatively, select + New and then select Gov Rule/Quota.
- Select the template Block when Zero Prepaid Balance Remaining.
- The next dialog shows a prompt to create a cohort for the governance rule automatically. Select Continue to create the cohort. After this point, the rule becomes active. Since we haven’t specified what to block users from, the rule requires that users have credits to access any endpoint.
- Select Block What to show the Regex Criteria pane.
- Select Request Route from the Select Field list and enter
"/ai-chat"as the regular expression criteria. - Select Save.
If you follow these steps, the governance rule looks like this:
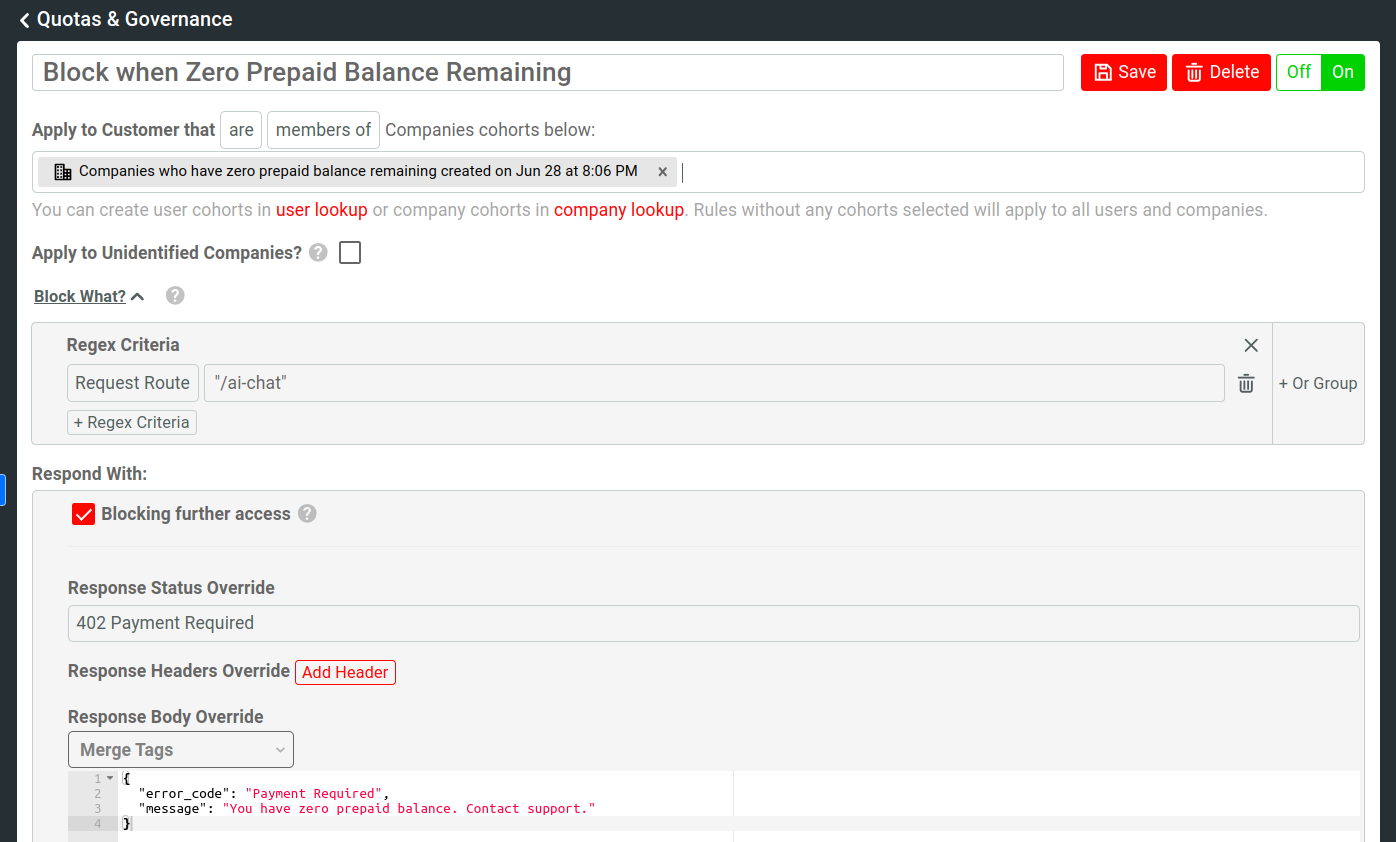
This governance rule currently blocks any user who tries to access the /ai-chat endpoint with zero prepaid credits. If you only have a single endpoint in your API, you don’t need to explicitly tell Moesif what to block. However, if you have multiple routes, you may want to ensure that this only applies to specific routes.
You may also have users with post-paid subscriptions. If you want block them from accessing the API when they have overdue invoices, you have to take a slightly different approach. Let’s look at how to implement that next.
Blocking API Access For Users With Overdue Invoices
For blocking API users from accessing the API when they have an overdue invoice, Moesif also offers a governance rule template.
- Select Quotas & Governance from the navigation menu and then select + Add New. Alternatively, select + New and then select Gov Rule/Quota.
- Select the template Block on Unpaid Invoices.
- The next dialog shows a prompt to create a cohort for the governance rule automatically. Select Continue to create the cohort. After this point, the rule becomes active. Since we haven’t specified what to block users from, the rule requires that users have credits to access any endpoint.
- Select Block What to show the Regex Criteria pane.
- Select Request Route from the Select Field list and enter
"/ai-chat"as the regular expression criteria. - Select Save.
This governance rule currently blocks any user who tries to access the /ai-chat endpoint with overdue invoices. This rule only makes sense to implement if you use a post-paid billing model. For pre-paid, you can make use of the previous rule. In the case that users can use either post-paid or pre-paid, you can enforce both rules.
Using Governance Rules, you can also enforce pre-paid quotas or keep post-paid subscribers within the ranges they have selected, stopping them from bumping to the following usage tier. For more information on how to use governance rules to enforce tier-based billing, see Implementing Subscription Tiers with Moesif and Stripe .
Conclusion
In this article, we’ve achieved quite a lot in terms of monetizing our AI API with with some robust toolings:
- The pricing for the APIs.
- API usage metering with Moesif Billing Meter.
- API Access rules using Moesif Governance Rules.
Now we can confidently bill users for their usage and block them when they run out of credits or have overdue invoices. At this point, we can push the API and billing infrastructure to production. In the next tutorial in this series, we will cover how to add credits to a user’s account so that they can use the API and burn through credits.
Want to follow along as we build out this billing infrastructure to monetize APIs? Sign up for a free trial of Moesif and follow this article series for a step-by-step path for implementing API monetization. Until next time, stay tuned for the next part in this series on monetizing AI APIs!


Related Articles

API Strategy
Leveraging AI For a Better API Strategy
Learn how to leverage AI to build and fortify your API strategy. Improve design, governance, documentation, and align APIs with business outcomes.
API Strategy
The 5 Best Mixpanel Alternatives of 2025
Learn about the best Mixpanel alternatives to determine the right analytics solution for your use case.

API Development
How to Leverage Moesif Effectively for API Observability
Effectively leverage Moesif for API observability through best practices for integration, event enrichment, custom actions, and engineering workflow integrat...
API Strategy
How to Build an Internal Chargeback Model for Your API and AI Usage Using Moesif
Use Moesif to implement internal chargebacks and enable precise API and AI cost attribution for better transparency and resource optimization.