Integrating with Stripe
This page assumes that you already have a Stripe account created and are able to create plans. To sign-up and create a Stripe account, visit the Stripe website.
How it works
A billing meter is created via the Moesif UI for a specific metric and filter criteria that you want to charge for.
- The filter criteria defines what the meter should include such as specific endpoints, certain customers, or other filter criteria.
- The metric is what is metered. It could be number of API calls, unique users, an aggregation on a header or body field, or any other metric trackable by Moesif.
Once the meter is created, Moesif will automatically meter the usage for each company and charge your customers via Stripe. Moesif billing meters support a variety of billing models including prepaid, postpaid, Pay As You Go (PAYG) and more. If you have different features or metrics you need to charge on, you can create multiple meters in Moesif, each linked to a different Product and Price in Stripe. The integration also syncs subscription and revenue data from Stripe to Moesif so you can understand how API usage translates to revenue.

Prerequisites
To integrate Stripe with Moesif, make sure you have an active Stripe account.
Additionally, make sure to meet the following requirements:
- The product has a recurring price.
- The pricing model is usage-based and usage is metered.
- The price contains a description (optional, but highly recommended).
- A Stripe billing meter only associates with one price. Reusing a Stripe billing meter for more than one price might result in charging a customer multiple times for the same usage amount.
- The Stripe billing meter uses either a Sum or Last aggregation formula to aggregate meter events.
These docs are for Stripe’s new meter APIs which is recommended for new setups. Moesif also supports Stripe prices configured for the legacy usage records API.
Alternatively, you can model your products and prices using Moesif’s Product Catalog that automatically syncs with Stripe Product Catalog.
The following example creates a product and price in Stripe to demonstrate how you can use Stripe to model your usage-based pricing structure:
Creating a Product and Price in Stripe
The following steps demonstrate how to create a product, define its price structure, and create a billing meter for the price in Stripe.
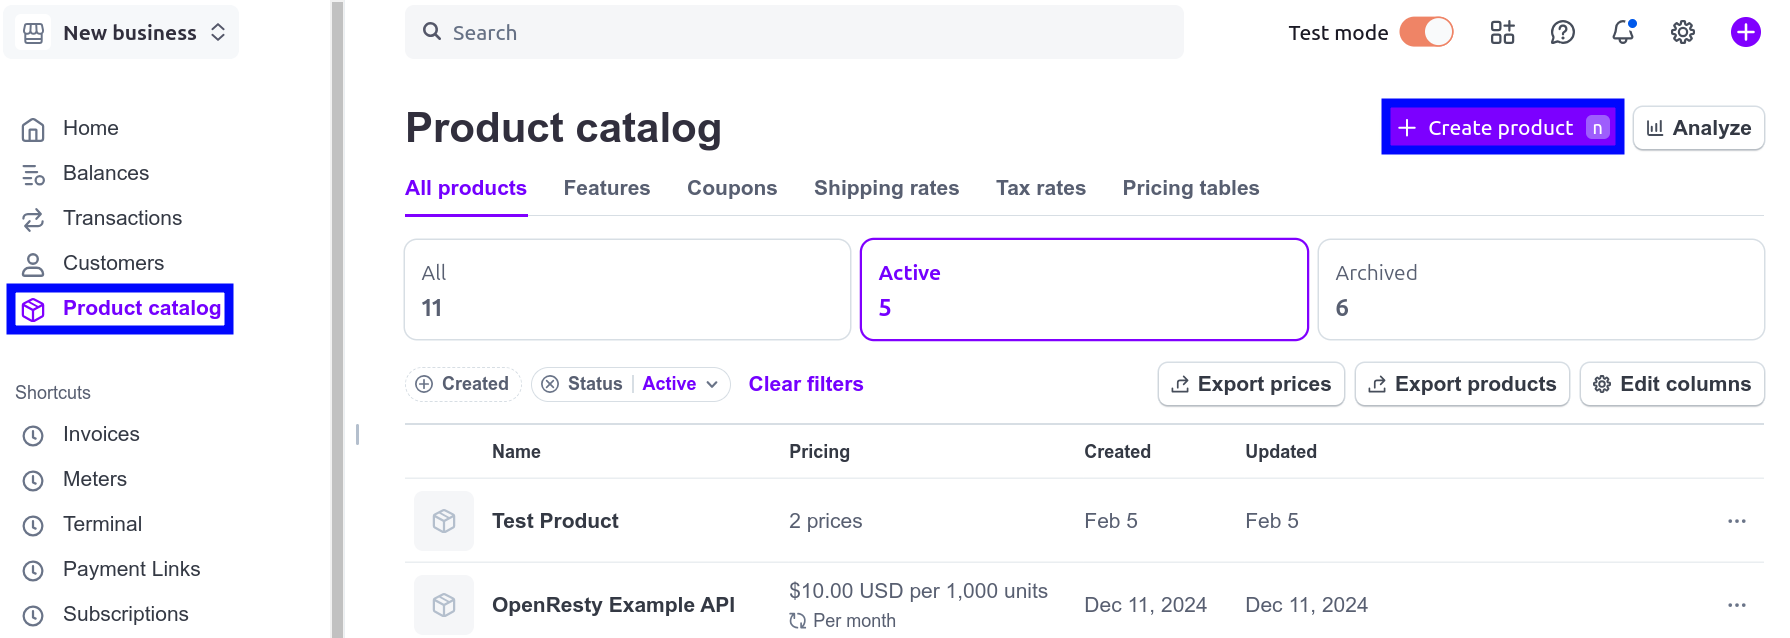
- Go to your Stripe Dashboard.
- Go to Product Catalog and then select Create product.
![Going to 'Product Catalog' and then 'Create product' in Stripe Dashboard]()
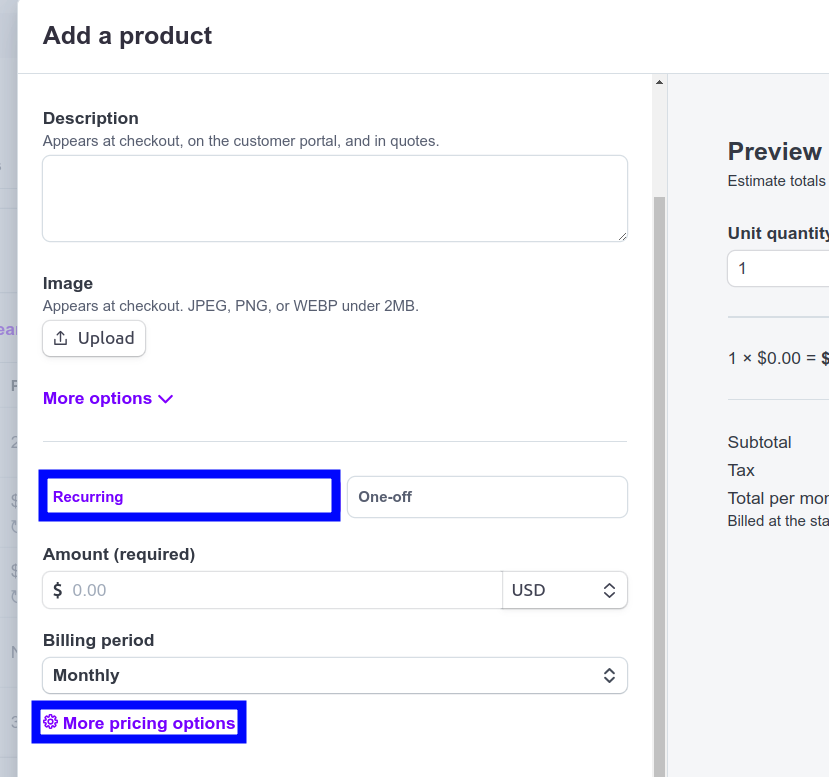
- Select Recurring and then select More pricing options.
![Specifying a recurring charging method for a product and selecting for more pricing options in Stripe Dashboard's product creation screen]()
- Select Recurring and choose Usage-based as the pricing model. You can choose the usage amount as package, unit, or tier.
- Define your price amounts, for example, $0.01 for each 1k API requests.
-
In the Meter section, select the plus icon + to create a billing meter to associate the price with.
a. Enter the meter name.
b. Enter the event name for which the billing meter reports usage.
c. Select the aggregation method for meter events. Moesif supports the Sum and Last aggregation methods.
d. Expand Advanced Options and make sure that Event Time Window is set to Raw.
- In the Advanced section, enter a description for the price.
- Select Next and then select Add product to finish.
After you finish configuring Stripe by following the rest of this document, the products and prices you have in Stripe appears in Moesif’s Product Catalog Plans and Prices. Any new product and price you create also syncs automatically between Moesif and Stripe, irrespective of which platform you create them in.
Configuring the Stripe integration
Moesif’s connection with Stripe involves 2-way communication. Moesif has created a simple way to get all the info you need and to configure certain variables for Stripe in a single screen. To access the Stripe setup details screen, follow one of these methods:
Access From Account Settings Menu
- Select your account icon to bring up the settings menu.
- Select Extensions.
- Search and select Stripe.
Access From Billing Meters Page
- Select Billing Meters in the navigation menu to open the Billing Meters screen.
- Select Edit Billing Providers dropdown
- Select Stripe.
Access From New Billing Meter Creation Page
- Select Billing Meters in the navigation menu to open the Billing Meters screen.
- Select + Add Billing Meter.
- Select Set up Stripe from the Select Billing Provider dropdown.
Once you’ve opened the configuration screen through one of the routes above, you can get the info needed to add the Moesif Webhook to Stripe, inputs to plug the Stripe API into Moesif, and customize your Customer ID source in a single place.
Adding the Moesif Webhook to Stripe
In Stripe, you need to add a webhook through which Stripe can send subscription updates to Moesif. Follow these steps to add the webhook:
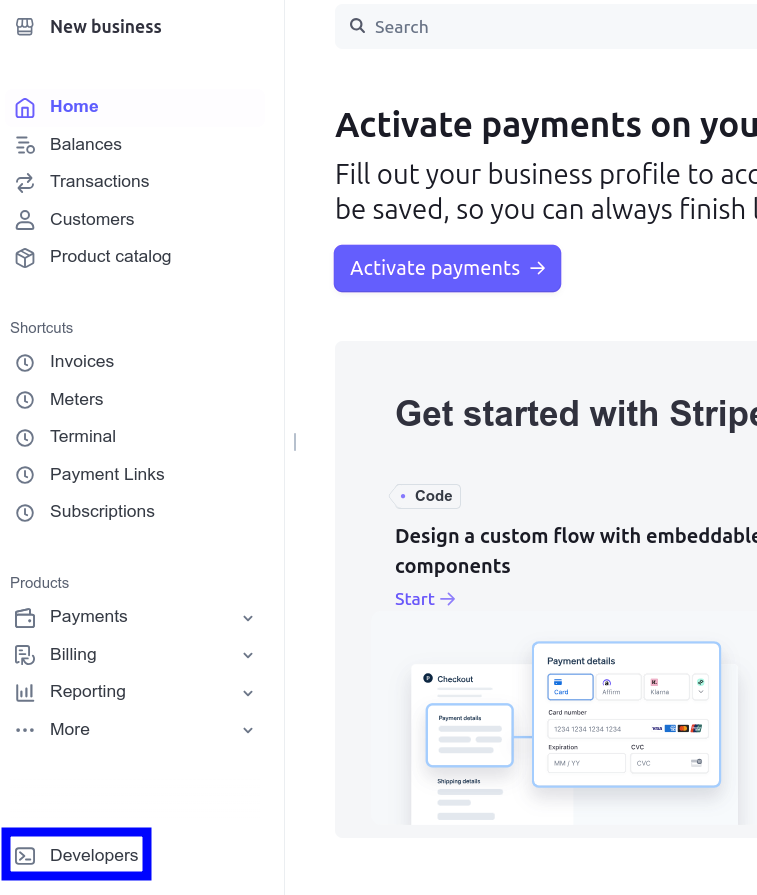
- Go to your Stripe Dashboard.
- Select Developers in the navigation pane to access the Developers Dashboard.
![Accessing]()
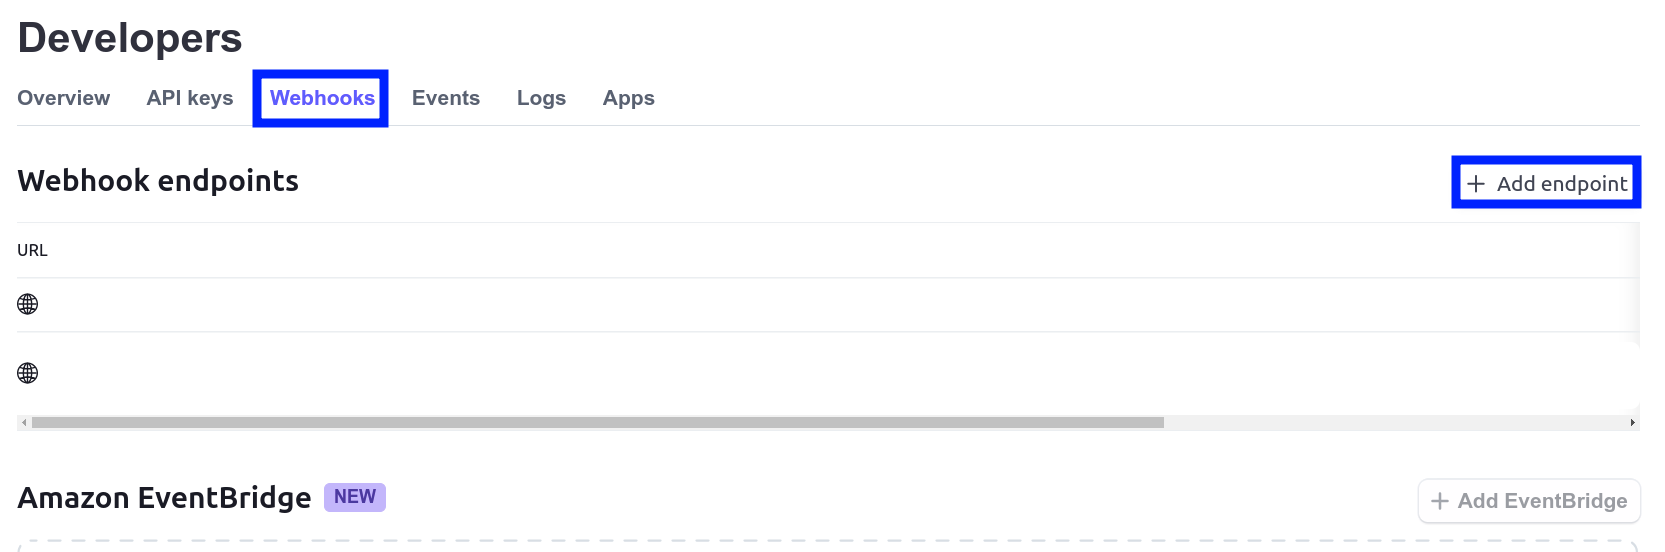
- Go to the Webhooks tab and then select + Add endpoint.
![Example]()
-
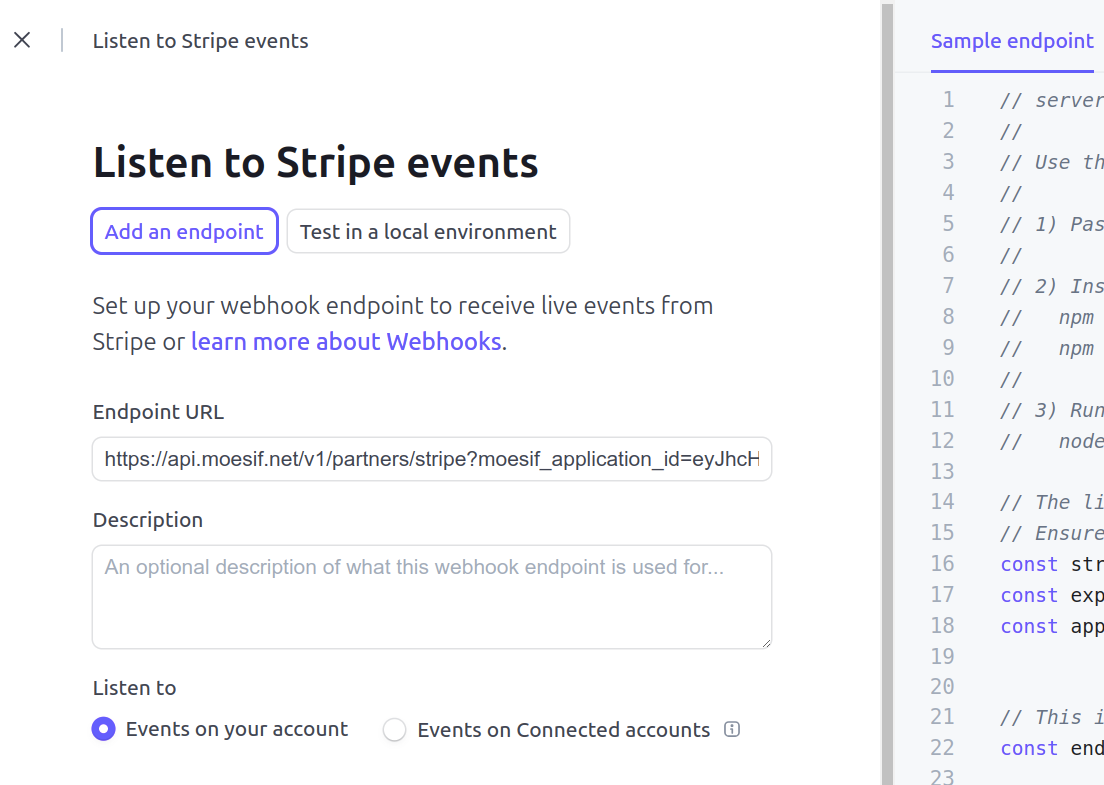
In the Listen to Stripe events screen that appears, paste in the Moesif Webhook URL in the Endpoint URL field. Optionally, add a description for the endpoint.
![Example]()
Remember that you can get the Moesif Webhook URL for Stripe in the Stripe configuration dialog. The Endpoint URL value you add to Stripe also contains your Moesif Application ID. The generated URL in the Moesif-Stripe configuration dialog already contains the correct Application ID and have it appended to the URL.
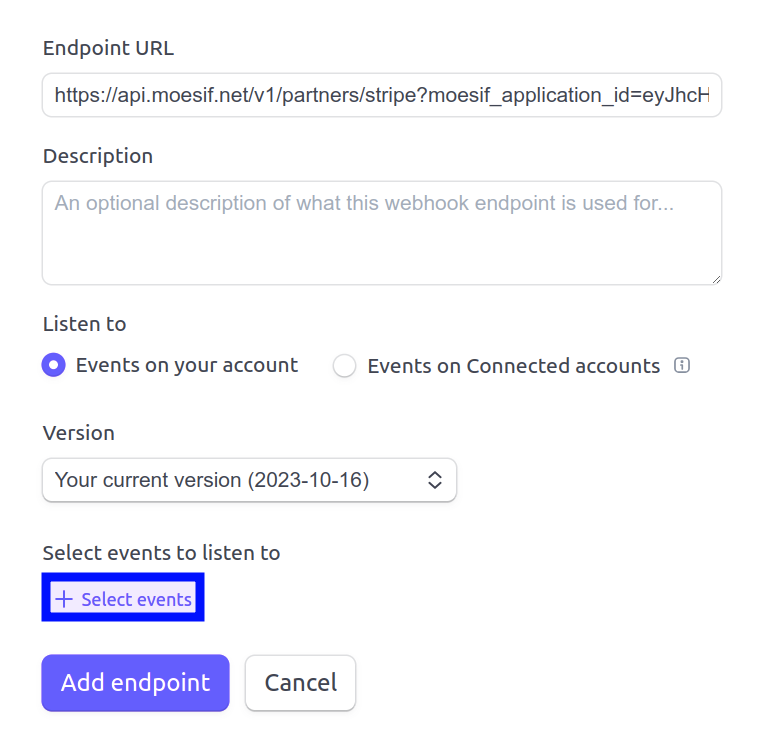
-
Next, configure the endpoint to listen to all events by selecting Select events.
![Example]()
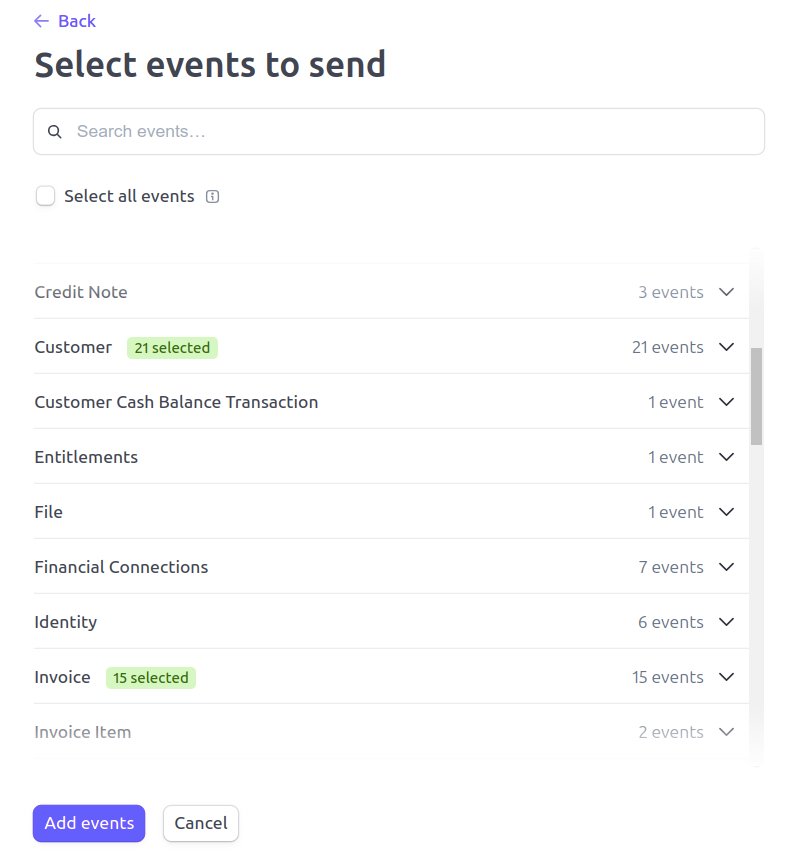
In the Select events to send screen, select all events for the Customer and Invoice event types and then select Add events at the bottom of the page.
![Example]()
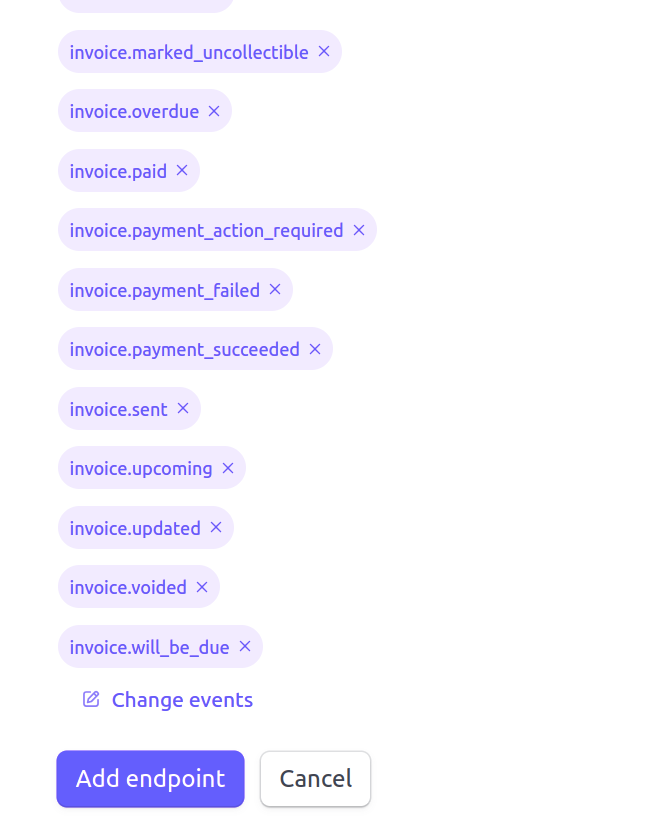
- Back in the Listen to Stripe events screen, select Add endpoint at the bottom (you’ll likely need to scroll to the bottom of the page).
![Example]()
The new webhook you’ve just added appears in the Webhooks tab of Stripe Developers Dashboard.

Configuring the Stripe extension in Moesif
In Moesif, enter your Stripe API key in the Stripe API Key field of the Stripe configuration dialog.
Moesif supports Stripe API Versions 2020-08-27 or higher.
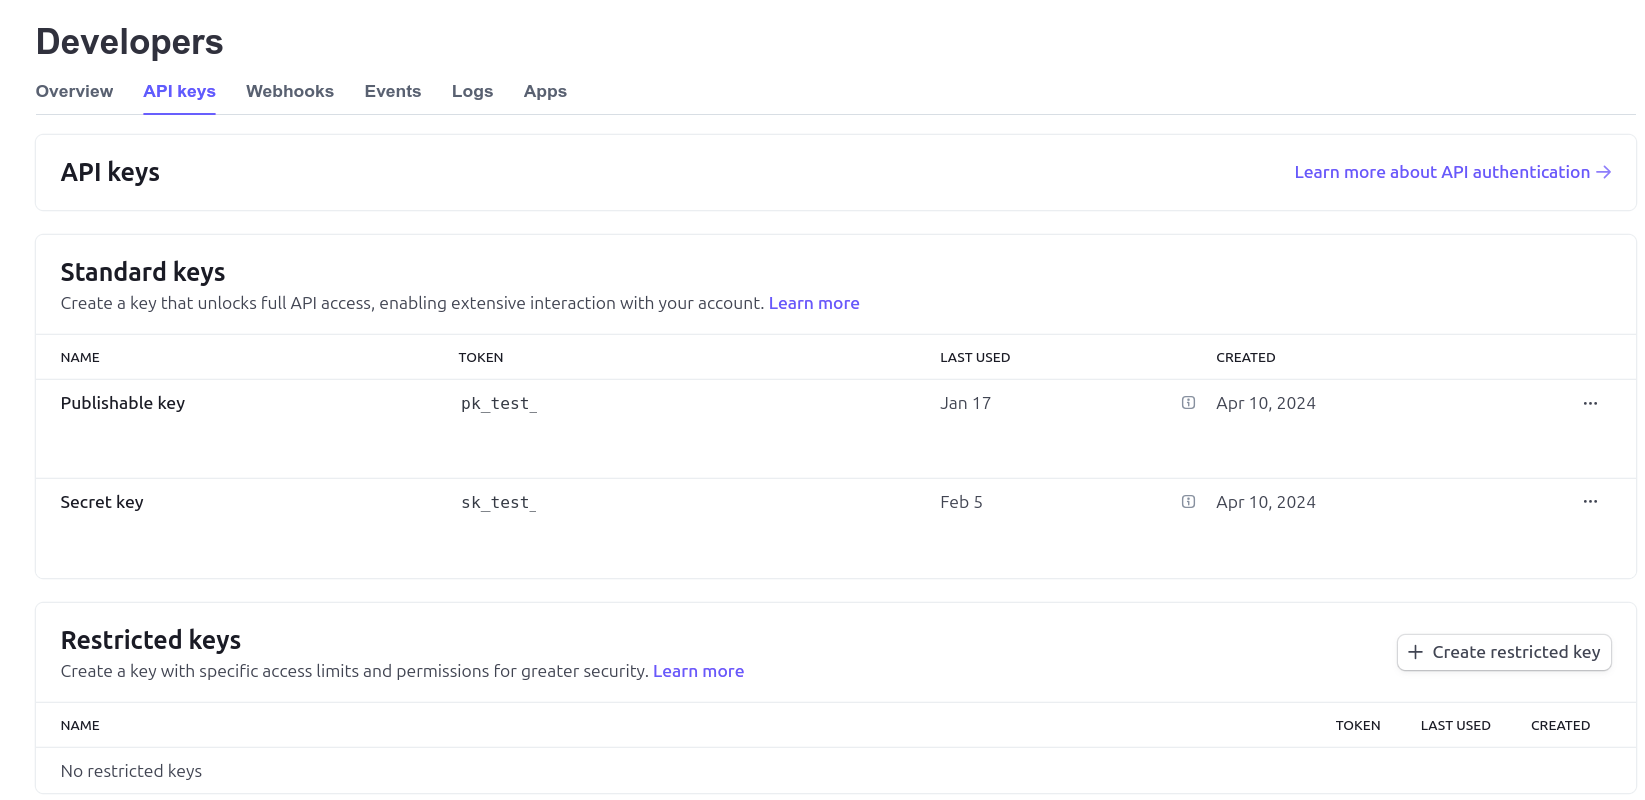
To get your Stripe API key, follow these steps:
- Go to your Stripe Dashboard.
- Select Developers in the navigation pane to access the Developers Dashboard.
- Go the API Keys tab.
- In the Standard keys list, in the Secret key row, select Reveal test key.
- Copy the key by clicking the key value. If you need more fine-tuned control over access, create a restricted key and copy that.
Stripe may prompt you to enter your password if the account has been inactive for a while.
This example uses test keys. To get a production key, switch over to live mode.
After you finish, select Save in the Stripe configuration dialog.
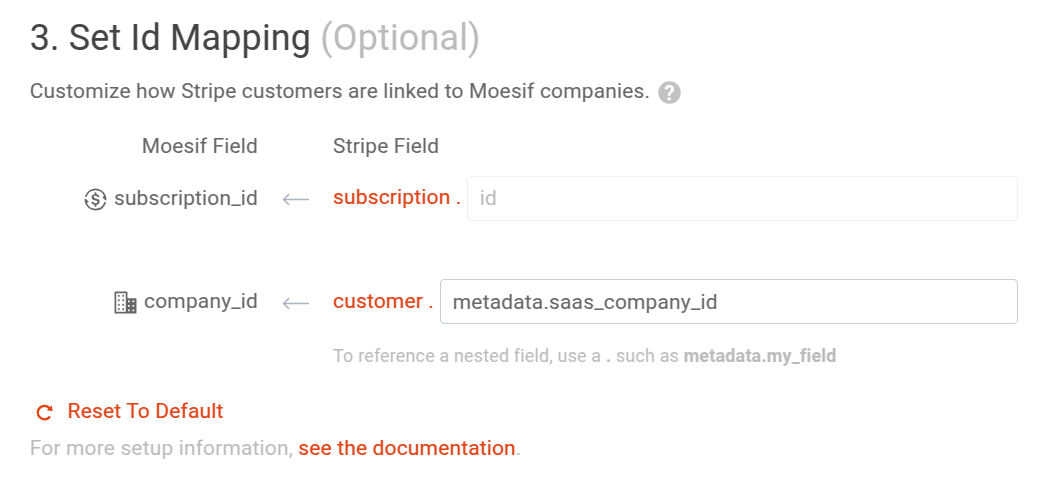
Set the Id Mapping
In Set Id Mapping in the Stripe configuration dialog, you can customize how Stripe customers link to Companies in Moesif:
- A Stripe Customer maps to Moesif Company.
- A Stripe Subscription maps to a Moesif Subscription.
By default, the Stripe configuration dialog contains the following mappings:
| Moesif field | Stripe field |
|---|---|
company_id |
customer.id |
subscription_id |
subscription.id |
You can’t modify the mappings between Stripe Subscriptions and Moesif Subscriptions. Moesif always maps Stripe’s subscription ID to Moesif’s subscription ID. However, you can modify how Stripe Customers map to Companies in Moesif, for example, if you have attached metadata information to the Stripe Customer object.
You can add metadata to the Customer object programmatically through the Stripe APIs or through the Stripe UI like this:
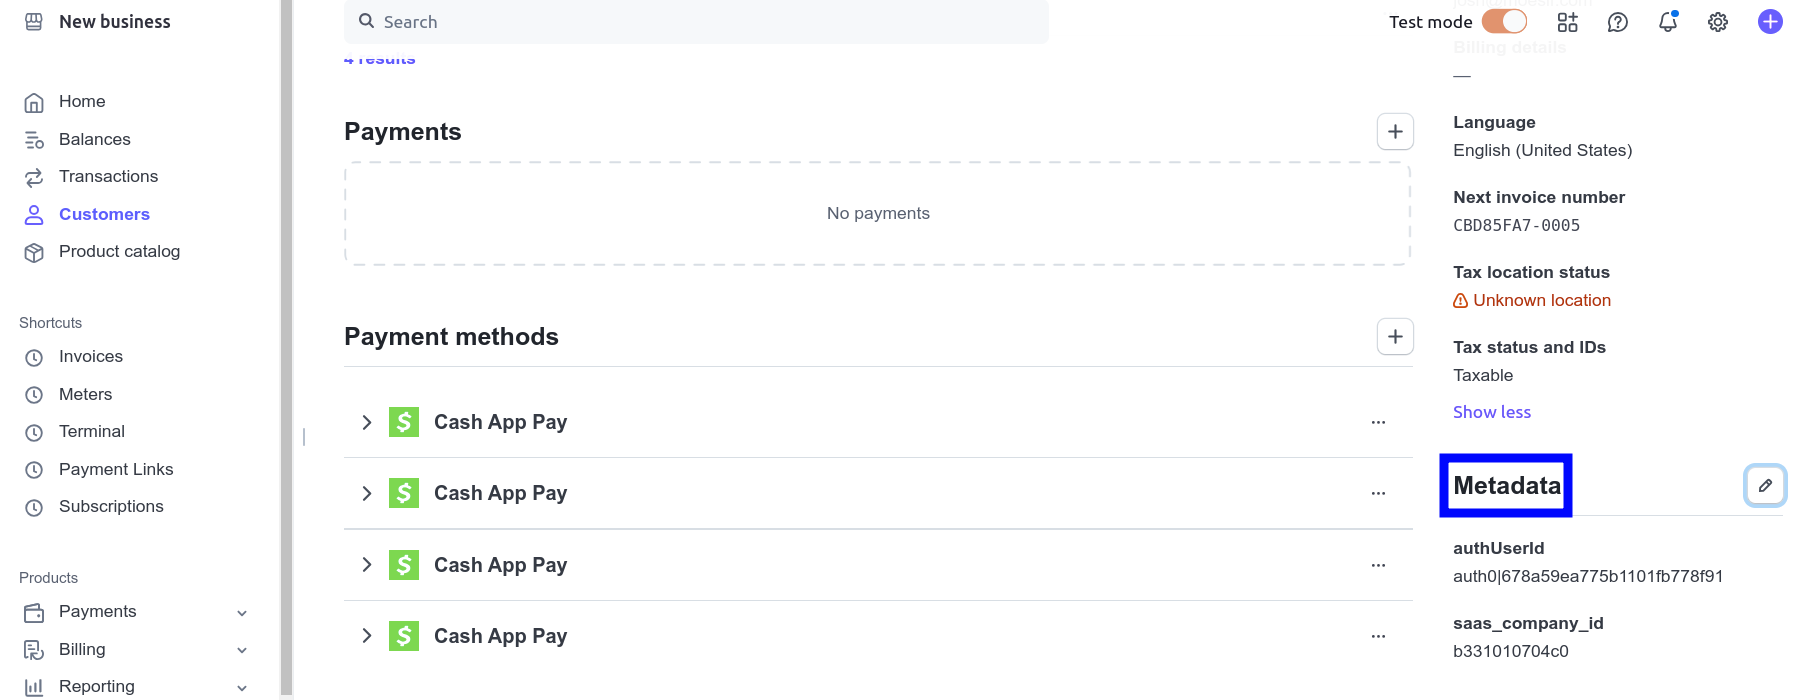
- Go to your Stripe Dashboard.
- Select Customers in the navigation pane and then select a customer field to access its details.
- Select edit in the Metadata section.
Next, make sure that the data you enter into the metadata fields match the value you have in the Moesif company_id field.
For example, we have a metadata field saas_company_id in the Stripe Customer object. So we can define the mapping like this:
Remember that the values for Moesif company ID and user ID must match what you’re mapping to in Stripe through this configuration. This is how Moesif syncs usage for the User or Company.
Note: If you change the mapping for an existing subscription, you must manually trigger a subscription update in Stripe. This makes sure that Stripe subscription data syncs to Moesif after your changes and Moesif continues to correctly meter and report usage. To achieve this, update Stripe Customer metadata.
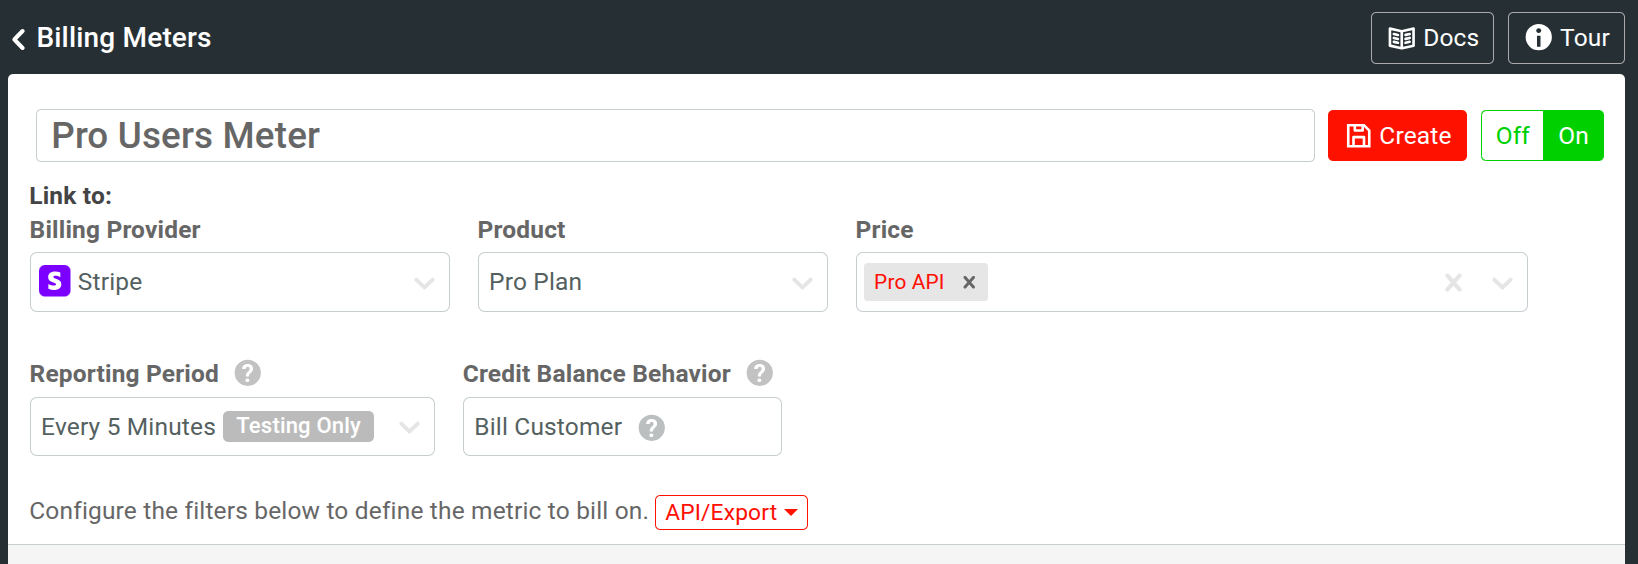
Linking a plan in Stripe to a billing meter
When creating a new billing meter, in the Link To section you can specify Stripe as the Billing Provider and then select the Product and Price you’d like the usage to be linked to.
Permission needed For Stripe Restricted API key
If you decide to create a Restricted Stripe API key, the minimum permission scope you need when creating the Stripe API Key are below:
{
  "permissions": [
    {
      "permission": "customer_read",
      "purpose": "Need to read customer details to report usage."
    },
    {
      "permission": "customer_write",
      "purpose": "Need to create customer balance transactions to support prepaid credits."
    },
    {
      "permission": "invoice_read",
      "purpose": "Needed for usage reporting and credit consumption."
    },
    {
      "permission": "plan_read",
      "purpose": "Need to get plan and price details to report usage."
    },
    {
      "permission": "plan_write",
      "purpose": "Enable creating plan and price using Moesif Product Catalogue tool."
    },
    {
      "permission": "product_read",
      "purpose": "Enable creating plan and price using Moesif Product Catalogue tool."
    },
    {
      "permission": "product_write",
      "purpose": "Enable creating plan and price using Moesif Product Catalogue tool."
    },
    {
      "permission": "subscription_read",
      "purpose": "Need to get subscription details to report usage."
    },
    {
      "permission": "usage_record_read",
      "purpose": "Need to see previous usage reported."
    },
    {
      "permission": "usage_record_write",
      "purpose": "Enabled report usage."
    },
    {
      "permission": "billing_meter_read",
      "purpose": "Enabled reading of Stripe billing meter."
    },
    {
      "permission": "billing_meter_write",
      "purpose": "Enabled writing of Stripe billing meter."
    },
    {
      "permission": "billing_meter_event_read",
      "purpose": "Need for usage based billing."
    },
    {
      "permission": "billing_meter_event_write",
      "purpose": "Need for usage based billing."
    },
    {
      "permission": "billing_meter_event_adjustment_read",
      "purpose": "Need for usage based billing."
    },
    {
      "permission": "billing_meter_event_adjustment_write",
      "purpose": "Need for usage based billing."
    }
  ]
}
Subscribing to a Product and Price
See Provider Mapping to understand how Stripe concepts like Products map to Moesif.
If you want to sell your product through a subscription model, you must set up Stripe Subscriptions. You can create and manage Stripe subscriptions in different ways.
You may have already integrated Stripe with Moesif. When you create products and prices in Stripe, Moesif automatically creates the corresponding Plans and Prices. You can access them in Product Catalog any time. Whenever a customer confirms a Stripe Subscription, Moesif automatically tracks and captures the subscription data including the associated products and prices. For example, you may have built a subscription page for your product or services with Stripe Checkout. At the end of a successful checkout session, you have a customer who’ve subscribed to pay a recurring price to use your product. Moesif starts tracking the subscription usage according to the Billing Meter you’ve created.
Moesif automatically syncs all the subscription data without any manual supervision.
Create Subscriptions
You can create subscriptions in different ways:
- Create and edit a subscription manually in your Stripe Dashboard.
- Use the Stripe API to create or update subscriptions.
See Create a Subscription in Stripe API Reference for more information about the Stripe Subscriptions API.